[What to know]Introduction
Authentication is the backbone of any modern application. Many developers start with Firebase Authentication because it’s simple, quick to set up, and beginner-friendly. But as applications grow, requirements often outpace Firebase’s capabilities — cost, scalability, flexibility, and integration with enterprise systems become pain points.
That’s where Amazon Cognito comes in — offering serverless, highly scalable, and secure identity management designed for production-grade apps.
This post will cover:
- A comparison of Firebase Auth vs. Cognito
- Why teams migrate to Cognito
- Pricing differences
- Feature differences
- A high-level migration approach
[Side by Side]Firebase Authentication vs Amazon Cognito
| Feature | Firebase Authentication | Amazon Cognito |
|---|---|---|
| Ease of Setup | Very quick, minimal config, great for MVPs | Setup requires more steps (User Pools, Identity Pools), but more control |
| Identity Providers | Email/Password, Social (Google, Apple, FB), Phone | Same + SAML, OIDC, Active Directory, enterprise SSO |
| Scalability | Scales well but better suited for mobile/web apps | Built for large-scale enterprise workloads (millions of users) |
| Custom Logic | Limited custom flows, extensions via Cloud Functions | Lambda triggers allow full customization (signup, login, token issuance) |
| Multi-Tenant Apps | Not natively supported | Flexible with custom attributes, groups, roles |
| Security | Good, but mostly Google Cloud centric | Deep integration with AWS IAM, security compliance (HIPAA, GDPR, FedRAMP) |
| Data Location | Managed by Google, less region choice | Full region selection in AWS |
| Analytics | Strong integration with Firebase/Google Analytics | Integrated with AWS CloudWatch & third-party tools |
| Vendor Lock-In | Tight Google ecosystem tie | Works across AWS + external systems |

[Cost]Pricing Difference
Firebase Authentication
Free tier: 50K monthly active users (MAU) for email/password.
After that: ~$0.01–0.06 per MAU (varies by provider).
Phone auth can get expensive quickly (per-SMS charges).
Amazon Cognito
Free tier: 50K monthly active users per month for user pools.
After that: $0.0055 per MAU (generally cheaper at scale).
Federation and advanced security features add cost, but still competitive.
Bottom line: For small apps, both are affordable. At enterprise scale, Cognito is usually cheaper than Firebase Auth, especially when federating enterprise identities.
[Migrating]Why Migrate from Firebase to Cognito?
Need for enterprise identity support (SAML, OIDC, Active Directory).
More fine-grained security policies (IAM integration, region control).
Compliance requirements (HIPAA, GDPR, FedRAMP).
Avoiding vendor lock-in with Google.
Better cost predictability at scale.
Customizable flows with Lambda triggers.
[Plan]High-Level Migration Path
Plan
List current providers (Google, Apple, Email, etc.) in Firebase.
Export Firebase user data (UID, email, phone, tokens if possible).
Set Up Cognito
Create a User Pool (for sign-up/sign-in).
(Optional) Create an Identity Pool for temporary AWS credentials.
Configure social providers and federation as needed.
Migrate Users
Bulk import users via CSV into Cognito.
Handle passwords:
Either force password reset (simplest, most secure).
Or implement a “progressive migration” flow — validate old Firebase tokens during first login, then move to Cognito.
Update Frontend
Replace Firebase SDK calls with Cognito SDK / AWS Amplify (or directly Cognito APIs if avoiding Amplify).
Update sign-in/sign-up flows.
Test & Rollout
Run both systems in parallel during migration phase.
Gradually switch over traffic to Cognito.
[code block]Start Coding
STEP 1 : Plan
- List providers you use in Firebase (Google, Apple, Email, Phone).
- Export Firebase users (via Admin SDK or Firebase console).
- Decide: Will you migrate passwords or force resets
STEP 2 : Set Up Cognito
1. Create a User Pool (for sign-up/sign-in).
aws cognito-idp create-user-pool --pool-name MyAppUserPool
2. Create an Identity Pool for temporary AWS credentials.
aws cognito-idp create-user-pool-client \
  --user-pool-id <your-pool-id> \
  --client-name MyAppClient \
  --no-generate-secret
Enable federated providers (Google, Apple, etc.) if needed.
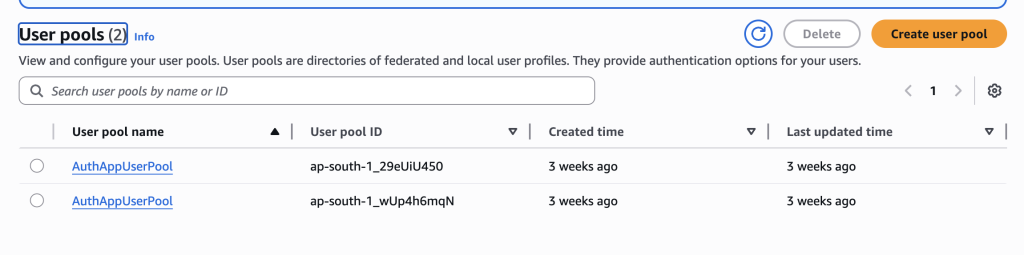
Below is the overview of Cognito User Pool configuration. The most critical values for your app are the User Pool ID, App Client ID (from App clients menu), and the JWKS URL (for token validation).Find below image is from the Amazon Cognito console, specifically the User Pool for a pool named AuthAppUserPool.
Left Sidebar
- Current user pool: Dropdown shows which User Pool you’re managing (
AuthAppUserPool). - Applications: Section to configure App clients (like your web app, mobile app).
- User management: Manage Users and Groups inside this pool.
- Authentication: Configure authentication methods (MFA, password policies, federated identity providers).
Main Panel (User Pool Information)
- User pool name:
AuthAppUserPool— the name you gave this pool. - User pool ID: A unique identifier. You’ll use this in your backend/frontend config.
- ARN (Amazon Resource Name): Globally unique identifier for this user pool. Helpful for IAM policies and automation.
- Token signing key URL: URL that exposes the JSON Web Key Set (JWKS). Your backend fetches this to validate JWT tokens issued by Cognito.
- Estimated number of users: Shows how many users are currently registered (here it’s
0). - Feature plan: Shows whether the pool is on the Essentials or Premium feature tier.
- Created time / Last updated time: Timestamp of when the pool was created/last modified

Step 3: Migrate Users
Bulk Import (This is to forces password reset)
- Export Firebase users to CSV.
- Import into Cognito using AWS CLI.
Step 4: Update frontend (React, React Native, Angular, Vue, etc.)
Key Responsibilities:
- Handle user sign-up, login, logout
- Manage tokens (ID token, Access token, Refresh token)
- Redirect authenticated users to dashboard
- Call backend APIs with a valid JWT in headers
Flow:
- User signs in using embedded Cognito SDK. (Not Hosted UI)
- Cognito returns JWT tokens.
- Tokens are stored in browser local storage/session storage (secure, httpOnly cookies recommended).
- Every API request → sends
Authorization: Bearer <JWT>header to backend.
Frontend Stack Example:
- React App with
amazon-cognito-identity-jsSDK - React Router for redirecting users after login
- Optional Amplify UI Components for faster integration (But I am not using amplify here. This is without amplify)
import {
  CognitoUserPool,
  CognitoUser,
  AuthenticationDetails
} from 'amazon-cognito-identity-js';

const poolData = {
  UserPoolId: 'us-east-1_XXXXXX', // from AWS console
  ClientId: 'XXXXXXXX'           // app client id
};
const userPool = new CognitoUserPool(poolData);

function login(username, password) {
  const authDetails = new AuthenticationDetails({
    Username: username,
    Password: password
  });

  const user = new CognitoUser({
    Username: username,
    Pool: userPool
  });

  user.authenticateUser(authDetails, {
    onSuccess: (session) => {
      console.log('Login success, JWT:', session.getIdToken().getJwtToken());
      // redirect to dashboard
      window.location.href = "/dashboard";
    },
    onFailure: (err) => {
      console.error('Login failed:', err);
    }
  });
}
Step 5: Backend (Node.js, Python, Java, etc.)
Key Responsibilities:
- Validate Cognito JWT tokens
- Enforce authorization rules via claims (roles, groups)
- Provide protected APIs (user profile, app data, etc.)
Flow:
- Receives requests from frontend with JWT in headers.
- Verifies JWT against Cognito’s public JWK endpoint.
- Authorizes access based on claims (e.g., role = admin).
- Processes request and returns response.
Backend Stack Example:
- REST API built with Express.js (Node.js)
- Token verification middleware using Cognito JWKS
- Role-based access control (RBAC) with Cognito Groups
- Optional API Gateway + Lambda (for fully serverless apps)
import jwt from 'jsonwebtoken';
import jwkToPem from 'jwk-to-pem';
import axios from 'axios';

const poolRegion = "us-east-1";
const userPoolId = "us-east-1_XXXXXX";

let pems;

async function init() {
  const url = `https://cognito-idp.${poolRegion}.amazonaws.com/${userPoolId}/.well-known/jwks.json`;
  const response = await axios.get(url);
  pems = {};
  response.data.keys.forEach(key => {
    const pem = jwkToPem(key);
    pems[key.kid] = pem;
  });
}

export async function verifyToken(req, res, next) {
  const token = req.headers['authorization']?.split(" ")[1];
  if (!token) return res.status(401).send("Unauthorized");

  const decoded = jwt.decode(token, { complete: true });
  if (!decoded || !pems[decoded.header.kid]) {
    return res.status(401).send("Invalid token");
  }

  jwt.verify(token, pems[decoded.header.kid], (err, payload) => {
    if (err) return res.status(401).send("Unauthorized");
    req.user = payload;
    next();
  });
}

init();
Below image shows the list of all users in your Cognito User Pool, their email verification, confirmation status, and whether their accounts are enabled.
Header
- Users (33) → There are 33 users in this Cognito User Pool.
- You can view, edit, or create users here.
- Top-right buttons: Delete user to Remove selected users and Create user will Manually add a new user into the pool.
Table Columns
- User name : This is the unique identifier Cognito assigns each user (a UUID-like string). Clicking one opens the details of that specific user.
- Email address : The email associated with the user.
- Email verified : Shows whether the email address has been verified: Yes (Verified). No (Not verified)
- Confirmation status : Indicates if the user has completed the sign-up confirmation process. Confirmed (green) User finished verification (via email/SMS). Unconfirmed (grey) → User signed up but did not confirm email/SMS yet.
- Status : Account status: Enabled (green check) means User can log in. Disabled (would appear red) User cannot log in.
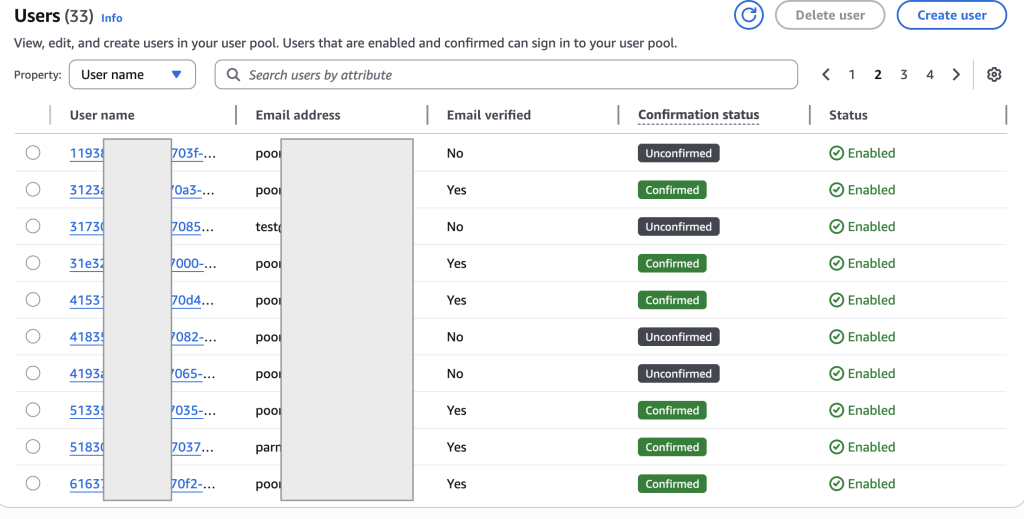
Diagram – Cognito Auth with Frontend & Backend
Here’s how the whole flow looks:
        +-------------------+           +---------------------+
        |    User (Client)  |           |     Cognito User    |
        |   (Web/Mobile)    |           |       Pool          |
        +-------------------+           +---------------------+
                 |                               |
     [Login / Signup Request] ------------------>|
                 |                               |
                 |<--------- JWT Tokens ---------|
                 |    (ID, Access, Refresh)      |
                 v
        +-------------------+       Authorization: Bearer <JWT>
        |   Frontend App    |------------------------------------+
        | (React / Native)  |                                    |
        +-------------------+                                    |
                 |                                               v
                 |                                   +----------------------+
                 |                                   |    Backend API       |
                 |                                   | (Node/Express/Lambda)|
                 |                                   +----------------------+
                 |                                               |
                 |                               [JWT Verification + RBAC]
                 |                                               |
                 v                                               v
        +-------------------+                       +----------------------+
        |   User Dashboard  |<------ Protected -----|   Application Logic  |
        |                   |       Data/API        |   + Database Layer   |
        +-------------------+                       +----------------------+
Challenges and Best practices:
Password migration: Firebase doesn’t give raw passwords, so you must choose between resets or progressive migration.
MFA differences: Cognito supports SMS/Authenticator MFA, configure carefully.
Frontend SDK choice: Amplify makes it easier but can feel heavy. Direct Cognito SDK works fine.
Conclusion
Firebase Authentication is an excellent starting point, but as apps scale into enterprise territory, Amazon Cognito wins on pricing, compliance, and customization. Migrating takes planning, especially with passwords, but the long-term benefits are worth it.
By following this step-by-step migration approach — from setup to frontend/backend changes — you can confidently move your app from Firebase to Cognito and unlock enterprise-grade identity management.