


[Deploy website]Introduction
- The Problem: Building a React Native app is fun, but deploying to iOS can feel like hitting a wall of certificates, profiles, and configuration errors.
- The Solution: This guide breaks down the deployment process into simple, bite-sized steps using two primary workflows: Expo EAS (the fast lane) and React Native CLI (the traditional route).
The Golden Choice: Expo vs. CLI
| Feature | Expo EAS Workflow | React Native CLI Workflow |
|---|---|---|
| Setup Time | ~5 minutes | ~30 minutes |
| Mac Required? | No (Cloud builds) | Yes (Requires Xcode) |
| Certificate Handling | Fully Automated | Manual configuration |
| Complexity | Extremely Low | Medium to High |
Route A: The Expo Way (Fastest & Easiest) MY FAV
- Step 1: Install EAS CLI — Log into your terminal using
npm install -g eas-cliandeas login. - Step 2: Configure Project — Run
eas build:configureto auto-generate youreas.jsonproduction profiles. - Step 3: Ship to TestFlight — Run the modern
npx testflightcommand. Explain that Expo securely communicates with Apple App Store Connect to handle certificates natively.
Essential Prerequisites
Apple ID with 2FA: Two-Factor Authentication must be enabled on the account handling the deployment.
[Step 1]Register the Bundle ID in the Apple Developer portal
Before App Store Connect will let you create the app, the Bundle ID must exist as an “App ID”.
- Go to https://developer.apple.com/account/resources/identifiers/list
- Click the blue
 next to “Identifiers”
 - Select App IDs → Continue
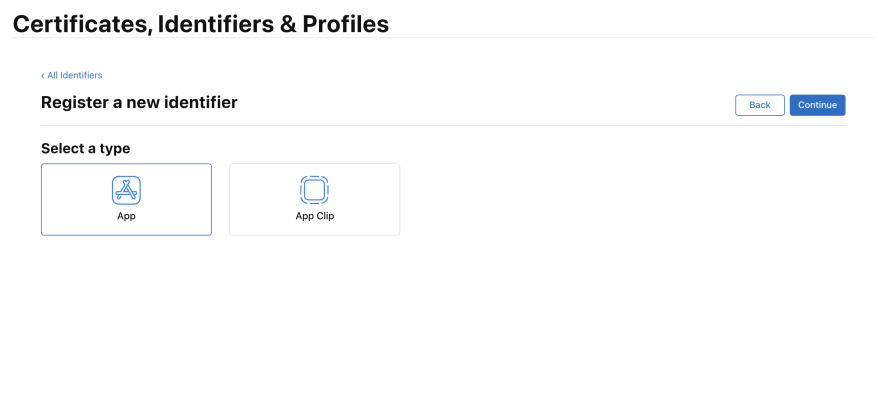
- Select App (not App Clip) → Continue
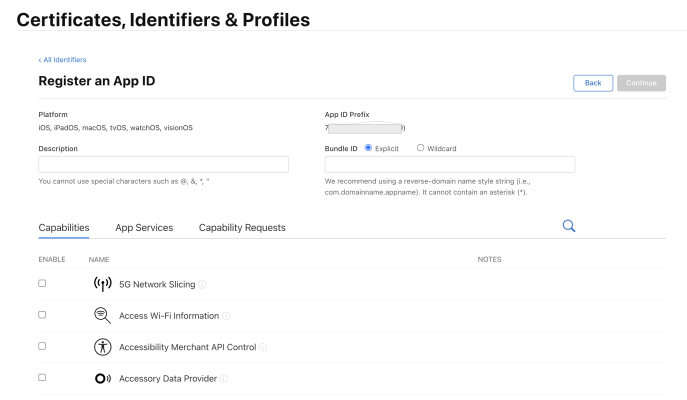
- Description: type YOURAPPNAME
- Bundle ID: choose Explicit, and enter exactly:
com.YOURAPPNAME.app
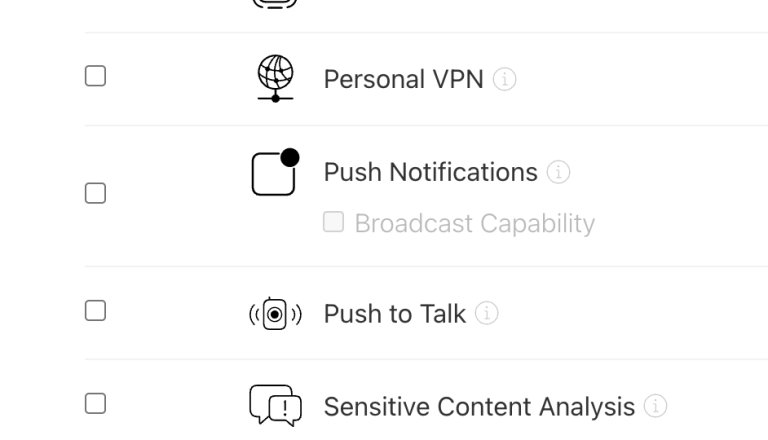
- Capabilities: tick Push Notifications (you’ll need it for notifications later). Leave the rest default.
- Click Continue → Register
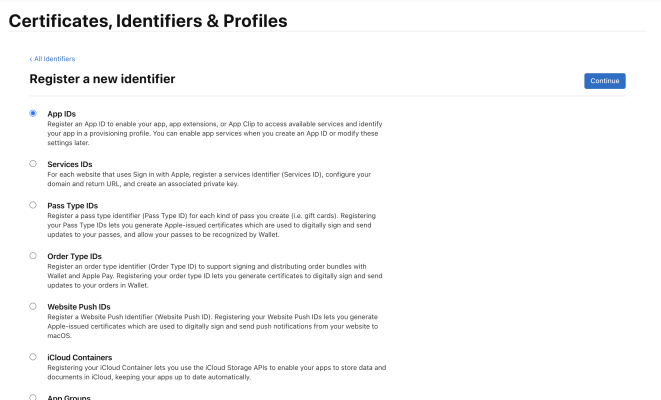
- Select App (not App Clip) → Continue
Description: type YOURAPPNAME
Bundle ID: choose Explicit, and enter exactly:
Capabilities: tick Push Notifications (you’ll need it for notifications later). Leave the rest default.
Click Continue → Register
[Step 2]Create the app record in App Store Connect
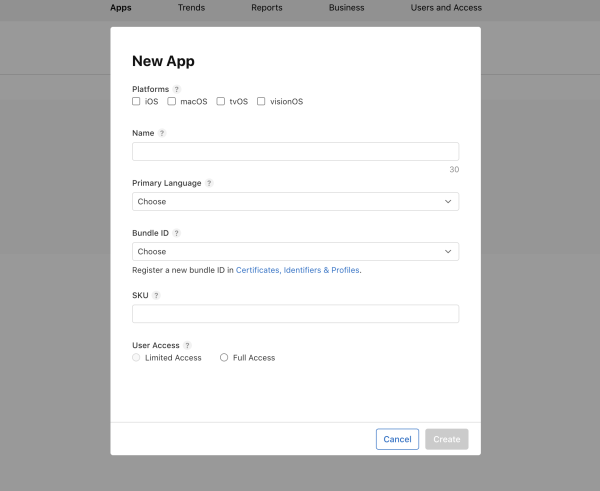
- Click the blue ➕ (top-left) → New App
- Fill the dialog:
- Platforms: tick iOS
- Name:
YOURAPPNAME(this is the public App Store name — must be globally unique; if taken, tryYOUR APP NAMEorYOUR APPLIVATION NAME) - Primary language: English (U.S.) — or English (India) if offered
- Bundle ID: select com.YOURAPPNAME.app from the dropdown (it appears because you just registered it)
- SKU: type
YOURAPPNAME-ios(internal-only identifier, never shown publicly — any unique string works) - User access: Full Access
- Click Create
You’ll land on the app’s dashboard.
[Step 3] Build the iOS app
In your terminal:


cd /Users/poonam/MobileApp/apps/mobile

eas build --platform ios --profile production
You’ll be prompted:
- “Do you want to log in to your Apple account?” → Yes
- Apple ID → enter the email of your new Apple Developer account
- Password → enter it → then your 2FA code (from your trusted device)
- EAS picks your Team automatically (if you have more than one, choose the new one)
- “Generate a new Apple Distribution Certificate?” → Yes
- “Generate a new Apple Provisioning Profile?” → Yes
- Push Notifications key — if asked to set one up → Yes (you ticked Push earlier, this wires it)
[Step 4]Upload the build to App Store Connect
Run this in your terminal (needs your Apple login again)::


cd /Users/poonam/MobileApp/apps/mobile

eas submit --platform ios --latest
Prompts:
- “Log in to your Apple account?” → Yes → Apple ID + password + 2FA (your new account)
- “What would you like to submit?” → it auto-detects the latest build (buildNumber 3) → confirm
- EAS asks for the App Store Connect App → pick TheLineCricket (
com.YOURAPPNAME.app) from the list
- If it asks to create an App Store Connect API Key → Yes (lets future submits run without 2FA)
It uploads the IPA to App Store Connect (~3–5 min). When done, the build appears under your app → TestFlight tab after Apple finishes processing (~10–15 min).
use Transporter, Apple’s free Mac app for uploading builds to App Store Connect manually. Since you have the EAS-built .ipa, this is the clean GUI route (no terminal/2FA dance).
Step 4 (manual) — Upload via Transporter
- Install Transporter — open the Mac App Store, search “Transporter” (by Apple), install it (free).
- Download your IPA:
https://expo.dev/artifacts/eas/eqweqeqeqwqeqeqweqeqew.ipa
Save it somewhere easy like your Desktop.
- Open Transporter → sign in with the same Apple ID as your new Developer account.
- Click ➕ Add App (or just drag the
.ipainto the window).
- Transporter validates it (checks bundle ID, signing, etc.) — takes a few seconds.
- Click Deliver.
- Wait for “Delivered successfully” (a few minutes).
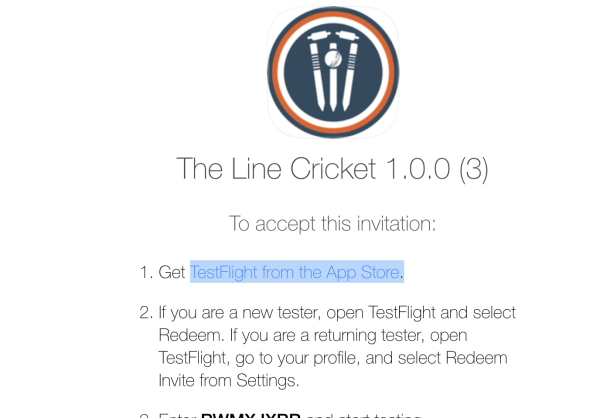
After delivery, the build goes to Apple for processing. In App Store Connect → your app → TestFlight, the build (buildNumber 3) appears as “Processing” then becomes available in ~10–15 min.
[Step 5] App Store listing (in App Store Connect → TheLineCricket)
A. The 3 things that cause first-submit rejections — get these right
- App Privacy (left sidebar → “App Privacy”) — declare what data you collect (account info, photos, usage, ads/AdMob → “Data used to track you”). Apple auto-rejects if this is blank or wrong.
- Demo account for review — your app needs login (username + OTP). Apple’s reviewer can’t receive your OTP, so in App Review Information you must give a test account + note. We need to set this up — see below.
- Screenshots — minimum one 6.7-inch iPhone set (1290×2796). Without these you can’t submit.
B. Required text fields (I’ll draft all of these — just say the word)
- Subtitle (30 chars)
- Promotional text
- Description
- Keywords (100 chars)
- Support URL →
https://thelinecricket.com - Marketing URL (optional)
- Privacy Policy URL →
https://thelinecricket.com/privacy(already live ✅)
C. Settings
- Category: Primary “Sports”, Secondary “Social Networking”
- Pricing: Free
- Age rating: fill the questionnaire (likely 4+ or 12+ if there’s user-generated content/chat → probably 12+)
- Build: once it finishes “Processing” (~15 min), select buildNumber 3
- Export compliance: you set
ITSAppUsesNonExemptEncryption: falsein app.json, so Apple shouldn’t even ask — if it does, answer No.
The demo-account blocker — important
Apple reviewers will open your app and hit the OTP login wall. They cannot get past it. Two options:
- Create a test account with a fixed OTP bypass — e.g. a special username where OTP is always
123456, documented in App Review notes. (Needs a tiny backend tweak.) - Give them a real number you control + be available to relay the OTP during review (risky — review can happen any time).
Option 1 is the standard. I can add a reviewer-only bypass account on the backend (e.g. username applereview always accepts OTP 000000), scoped so it only works for that one account. Low risk, removable after approval.